
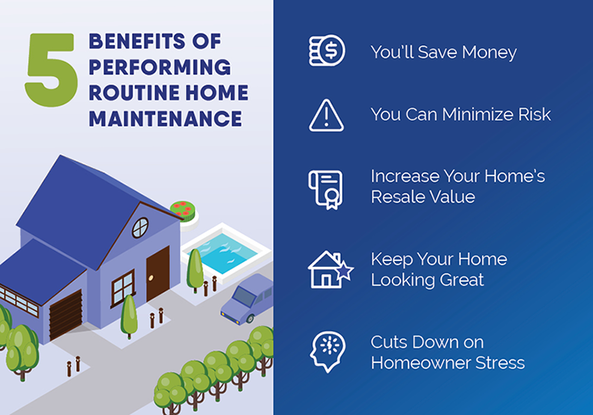
Monthly Home Maintenance
Performing a few simple monthly maintenance tasks on your home can prevent costly repairs down the road. The good news is that most of these chores are DIY-friendly, should only require common household tools, and cost very little to perform. Let's take a look at what you should be doing each and every month:
Performing a few simple monthly maintenance tasks on your home can prevent costly repairs down the road. The good news is that most of these chores are DIY-friendly, should only require common household tools, and cost very little to perform. Let's take a look at what you should be doing each and every month:
- Check HVAC system filters. Some air filters are reusable, while others are disposable and must be replaced. Clean or replace filters when they get dirty, which might be anywhere from 30 days to a few months.
- Look for leaks around toilets and sinks. Any sign of water where it shouldn't be is reason to investigate further. Even a tiny leak could cost hundreds of dollars each year.
- Inspect grout and caulking. Touch up any voids or cracks in tubs and showers. This keeps them looking nice while helping to avoid seeping water damage. Check the caulking around doors and windows on the exterior and interior to help keep your house energy efficient, and water tight! Making sure all penetrations leading into the house are sealed will help prevent pest and bug entry!
- Check kitchen vent/range hood filter. Clean or replace if needed. Consider looking at the filter more often if you have an avid chef in the household.
- Test smoke and carbon-monoxide detectors.
- Check and Trip your GFCI outlets.
- Stroll around outside. You're probably outside your home on a regular basis, but how often do you really look it over? Walk around the house and any outbuildings, looking for problems with the foundation, vents, gutters, downspouts and drainpipes.
- For more home maintenance tips click the button below!
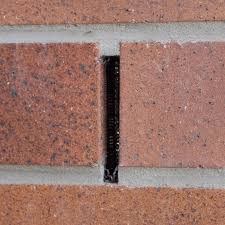
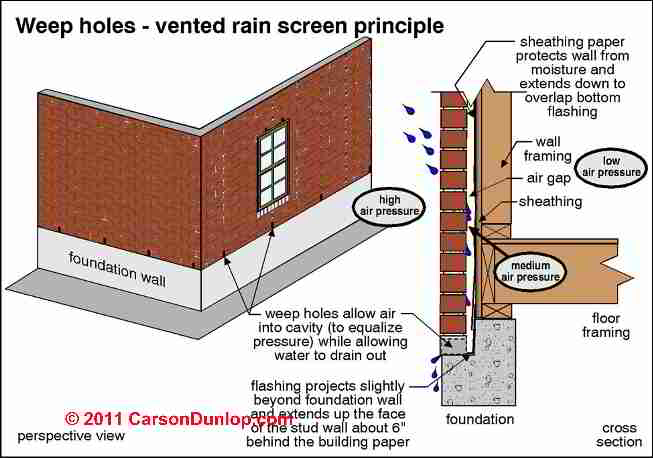
What are these holes in the bottom row of my brick siding?
Weep holes are drainage ports and an important part of your brick siding, they should never be sealed up. Most brick siding you'll see now days are going to be brick veneer. A brick veneer siding has a wall of full sized bricks with an air gap in-between the brick and the wood framing of the house. The wood framing is the actual structural part of the house holding the roof up and keeping the walls together, the brick is not structural and does nothing to hold up the house. As the veneer goes up, the brick structure is anchored to the sheathing with metal wall ties, or brick anchors. These are commonly L-shaped pieces of corrugated metal nailed through the sheathing and into the wall studs. Anchors are installed every four courses and spaced every 2 feet apart horizontally. If water or moisture were to get behind the brick veneer it would work its way down the walls due to gravity and drain out the weep holes in the brick. The weep holes are located on the top of the concrete foundation so usually the bottom row, a few rows up from the bottom row of brick on the exterior of the house, and above windows and doors. They make inserts you can put in your weep holes to help keep out bugs and spiders.
Weep holes are drainage ports and an important part of your brick siding, they should never be sealed up. Most brick siding you'll see now days are going to be brick veneer. A brick veneer siding has a wall of full sized bricks with an air gap in-between the brick and the wood framing of the house. The wood framing is the actual structural part of the house holding the roof up and keeping the walls together, the brick is not structural and does nothing to hold up the house. As the veneer goes up, the brick structure is anchored to the sheathing with metal wall ties, or brick anchors. These are commonly L-shaped pieces of corrugated metal nailed through the sheathing and into the wall studs. Anchors are installed every four courses and spaced every 2 feet apart horizontally. If water or moisture were to get behind the brick veneer it would work its way down the walls due to gravity and drain out the weep holes in the brick. The weep holes are located on the top of the concrete foundation so usually the bottom row, a few rows up from the bottom row of brick on the exterior of the house, and above windows and doors. They make inserts you can put in your weep holes to help keep out bugs and spiders.
Brick Siding
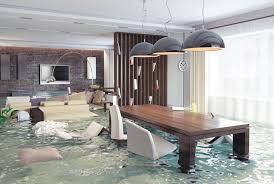
Water damage is one of the most common and costliest disasters your home can experience, costing billions of dollars annually. Safeguard your most important asset against water damage with the right insurance coverage and the following practical advice. About 40% of all homeowners have experienced a loss from water damage. It can spread contamination, ruin your paint and damage your wood. The good news is that 93% of all water damage could have been prevented with the right knowledge. One of the worst effects of water damage is the growth and spreading of mold and mildew. Water-logged areas can see mold growth after just a couple of days. It not only harms your home's structural integrity but also harms you and your family's health.
Water Damage
How to Prevent Water Damage
1. Inspect Sinks and Drains
Try to keep your sinks and drains in excellent condition by avoiding getting rid of cooking grease by pouring it down the drain. Flushing it with hot or cold water does not matter and grease can coagulate and cling to pipes. This causes severe damage or blocks the water flow.
Be careful using chemical drain cleaners. Although they are convenient, they can eat away at your pipes and set them up for leaks. Consider purchasing a drain snake, the perfect solution for clearing away clogs. You can make a difference:
Check your appliances often for leaks according to the manufacturer's instruction manual. They do not cover damages because of a lack of maintenance in most of the homeowner's insurance policies. Upgrade your hoses, such as washing machine hoses, and replace regularly to avoid the most reported cause of water loss and damage.
Inspect Fridge, Water Heater, AC Unit, and Attic
Shut off your water main if you leave the house for an extended period, such as going on vacation. During a trip, homes may be left empty for days and weeks. Even a small leak could cause colossal damage by the time someone notices or comes back. Turning off your water main while away can help prevent accidents from any unattended water flow.
4. Know Where Your Water Shut-off Valves Are
In case of a flood emergency, know where your water shut-off valves are located.
This includes:
5. Install Leak Detectors
Leak detectors are electronic devices that detect water or flooding and set off an alarm when triggered. They come in all shapes and sizes and have various ranges of features. Some have:
There are active and passive flood alarms. Integrated into the water system, active alarms can shut off the water supply. Place passive alarm next to the high-risk potential flooding areas. They go off when the sensors get wet. The downside to passive alarms is that it requires a manual shut off of the water system. Make sure you check batteries often! Basic leak devices are very affordable, ranging from $10 to $30 each. All they need is a 9V battery and you're set!
Install Leak Detectors in Places Like:
Some Things You Should Consider When Shopping for a Leak Detector:
These measure the flow of water into your house, directly attached to the water main. During special circumstances, where the monitoring system detects water flow that isn't consistent with every appliance use, it can stop the flow of water automatically. It installs next to your primary water line and doesn't require pipe cutting. It can use ultrasonic technology to identify leaks earlier and prevent severe water damage. A good water flow monitoring system can improve water efficiency and keep costs to a minimum. Most systems provide real-time water data via a computer or smartphone. It can help tremendously with water notifications, benchmarking efforts, and water use for best practices.
7. Check Water Pressure with a Pressure Gauge
A water pressure gauge is a mechanical instrument designed to measure water pressure in a variety of forms and has been around for over a hundred years. Made of up of a dial indicator, a piece of pipe or hose, and a threaded nut to fix to a tap, a pressure gauge is something you'll want to invest in for your home. A water pressure gauge is a wise investment, considering one of the most common issues with plumbing is over-pressured pipes. Water pressure is a measure of a force that pushes water through the water system. Without pressure gauges, fluid power systems are unpredictable. The gauges ensure there are no leaks or pressure changes.
Digital Pressure Gauges Allow Measurement of:
Absolute pressure is the measure of pressure including ambient air, such as compression ratio calculation. They make gauges measuring higher pressure of steel while they make lower pressure gauges of bronze. Increase in water pressure that is too high can cause pipes and hoses to burst. Buy a water pressure gauge and attach it to the outside of a faucet and it will give you a reading of the pressure. They make typical water systems to withstand 40–70 psi. If your water pressure surpasses 100 psi, install a pressure regulator. Call the plumber if you spot levels under 30 psi or over 80 psi. You can measure static water pressure and identify leaks in plumbing or gardening systems. Having too much water pressure can be hard on lines and fixtures or cause problems with flex lines and hoses. If your pressure is too low, call your water supplier or utility and ask about someone coming out to look at the problem. They can adjust the pressure reducing valve (PRV) and fix the pressure.
8. Buy or Replace a Pressure Release Valve
Also called "water pressure reducing valves," this valve can help with any increase in pressure caused by temperature decrease in freezing pipes and help prevent them from bursting. It can control or limit the pressure in the water system. It brings the pressure down to a safe level before the water reaches any plumbing in the home. A valve costs about $20 and calling in expert help might be around $200. This ensures proper diagnosis and installation. Protected by a water pressure reducing valve, the water system has less stress on inner valves, faucets, and appliances. You can purchase a pressure release valve at a hardware store. After installation, test the water pressure and adjust the regulator. Replace a failing valve immediately. Water heater release valves can drain water to reduce inner tank pressure. If water inside gets too hot or pressure reaches an unsafe level, the water heater triggers to the valve to open. Checking the valve on your water heater can help prevent burst pipes. The valves remove excess pressure by opening up and minimizing pressure.
Valves Can:
You can reduce or eliminate leaks around your windows and doors by purchasing a tube or a few and doing the job yourself. If you notice a crack, caulk it! Telltale signs of water leakage may be mold spots, bubbled paint, crumbly drywall or plaster, or termite activity. With blowing winds and strong rains, water can easily get into your home. Seepage can damage window frames and the surrounding drywall. Apply caulk to both sides of the window and use weather stripping to seal up spots that won't close tightly. Consider installing storm windows for additional layers of protection. Sealing your windows and doors will prevent water from coming in and increase the electrical efficiency of your home.
10. Monitor Your Water Bill
Check your water bill regularly and get an estimate of the average amount of water used per month. If your usage jumps tremendously from one month to the next, without obvious explanation, you may have a mystery water leak. An unusually high water bill may be due to:
* A leaking toilet
Clean your gutters once every few months to avoid blockage. Standing water can cause damage to your gutters and roof or puddles that could damage your foundation. A clogged gutter can send water down the side of your house. It costs around $50-$250 to clean gutters. In winter, clear out ice dams as soon as they appear.
12. Install Gutter Guards
Install gutter guards, or attachments used to protect the clogging of your gutters so that water can flow away from your home and not pool up around your foundation. Gutters can get clogged easily because of dead leaves, nests, and branches. If gutters are regularly clogging with leaves and debris, then install the guards. They will prevent gutters from clogging up and prevent you from having to clean them constantly. If your gutters are too high, hire a professional to check and clean them.
13. Clean Downspouts and Decline Your Soil
Clean the downspouts so that water can get through. Direct downspouts 5-10 feet (ca. 3 m) away from the house. Slope your yard away from the foundation. Slope keeps water from getting down next to your foundation, and when left unchecked could cause cracks, wall leaning, and create leaks. Water should flow away from your home toward the street, backyard, or back alley.
14. Maintain Trees and Shrubs
Try to minimize landscaping near pipes or remove trees or bushes that have grown too big. Do not let your soil get too dry in drought, as your house can dry and shrink. Run a soaker hose half a foot away from the foundation and 3 inches (ca. 8 cm) beneath the soil to keep it from contracting and expanding. Trees with invasive root systems could grow into your sprinkler system, drainage field, or pipes. Plant trees at least 20 feet (ca. 6 m) away from your home.
15. Decline Your Soil
Move the soil around your house with a shovel and rake to decline it. You want your soil to ramp down away from the foundation wall. Pack the soil so that you encourage water to move along the top instead of soaking into it. Create a downward slope away from your home and this will encourage water to flow away instead of soaking your foundation.
16. Monitor Your Sump Pump
This pump is usually in the basement. It represents your home's last line of defense during raising groundwater or flooding on the inside. When the water rises in this pit, the buoyant float sets off the connected motor, telling it to pump water out of the home. It removes water from where it shouldn't be to a better area.
Repair any obvious dripping pipes. Check for dark spots around pipes and on the ceiling. Repair any cracked caulking. Also inspect the roof for missing, loose, or damaged shingles. Look for moss that can work under shingles and damage from fallen limbs. Check for proper drainage. Insufficient drainage weakens your foundation and can cause cracks, uneven settling, and ways for water to enter your home.
18. Repair Your Chimney!
Inspect and repair your chimney. Loose mortar or cracked bricked may cause issues. Look for signs of leakage around the chimney. Rain can come through uncapped chimneys, especially from the sides. It can cause major water damage in the attic, walls, and floors.
To prevent damage you can:
Replacing your pipes will ensure that no pinhole leaks damage your home. Exchange copper pipes for corrosion-free ones. Change out corroded or solid copper pipes with the replacing PEX pipes. The copper pipe joints can fail. It can cause corrosion that leads to holes, resulting in silent but steady leaks of water. Drips such as this can lead to damage to ceilings and on the inside of the walls.
20. Install Floor and Drain Pans
Consider implementing floor plans under your appliances. They can help prevent damage from small or subtle undetected leaks in your home. You may need to install a drain or create a sloped surface to help water move to the right area to drain.
Preventative Measures to Reduce the Risk of Water Damage
So no matter what the cause of water damage, you can follow all these suggestions to help reduce the risk of bursting pipes, water damage, and flooding in your home. Taking preventative measures can help you avoid or lessen the chances of this destructive damage from happening, which will not only make you happy but your homeowner's insurance company as well!
Try to keep your sinks and drains in excellent condition by avoiding getting rid of cooking grease by pouring it down the drain. Flushing it with hot or cold water does not matter and grease can coagulate and cling to pipes. This causes severe damage or blocks the water flow.
Be careful using chemical drain cleaners. Although they are convenient, they can eat away at your pipes and set them up for leaks. Consider purchasing a drain snake, the perfect solution for clearing away clogs. You can make a difference:
- Regularly clean drains
- Clean out the strainer and put debris in the trash, not in the drain or toilet
- Make sure your tub's overflow drain is working and not leaking
- Check on drain taps regularly, found in sink cabinets.
Check your appliances often for leaks according to the manufacturer's instruction manual. They do not cover damages because of a lack of maintenance in most of the homeowner's insurance policies. Upgrade your hoses, such as washing machine hoses, and replace regularly to avoid the most reported cause of water loss and damage.
Inspect Fridge, Water Heater, AC Unit, and Attic
- Refrigerator -- Does it have an ice maker or water dispenser? Double-check the water line hose in between your refrigerator and the wall. Make sure there are no leaks.
- Water Heater -- Inspect your water heater once annually and stay up to date with it. Notice any slow leaks, water pooling, or any rust or corroded areas. Consider upgrading to a water heater without a tank or on-demand water heater so you can cut costs on your electric bill.
- AC Unit -- Properly maintain your AC unit for signs of leaks or water damage, especially if it's working overtime in the scorching summer months.
- Attic -- This is a prime environment for mold growth and humidity. Water saturates woods and prepares conditions for mold to grow and spread, which is not only a home hazard but a health hazard.
Shut off your water main if you leave the house for an extended period, such as going on vacation. During a trip, homes may be left empty for days and weeks. Even a small leak could cause colossal damage by the time someone notices or comes back. Turning off your water main while away can help prevent accidents from any unattended water flow.
4. Know Where Your Water Shut-off Valves Are
In case of a flood emergency, know where your water shut-off valves are located.
This includes:
- The whole-house water shutoff
- Hot water shutoff on your water heater
- Inline shutoff valves to toilets and sinks
- Valves leading to dishwasher and clothes washer
5. Install Leak Detectors
Leak detectors are electronic devices that detect water or flooding and set off an alarm when triggered. They come in all shapes and sizes and have various ranges of features. Some have:
- Wi-Fi capabilities
- Smart home integration
- Phone alerts
- Temperature sensors
There are active and passive flood alarms. Integrated into the water system, active alarms can shut off the water supply. Place passive alarm next to the high-risk potential flooding areas. They go off when the sensors get wet. The downside to passive alarms is that it requires a manual shut off of the water system. Make sure you check batteries often! Basic leak devices are very affordable, ranging from $10 to $30 each. All they need is a 9V battery and you're set!
Install Leak Detectors in Places Like:
- Basement and attic
- Near the AC Unit
- Laundry room
- Water heater closet
- Washing machines
- Bathroom for the tub and toilet
- Under kitchen sink or near dishwasher and refrigerator
- Near any water pipes
- Any other area of house susceptible to water damage
- Monitor for the presence of water
- Track ambient temperatures
- Detect moisture in the air that could cause mold
- Turn off your water supply in case of an emergency
Some Things You Should Consider When Shopping for a Leak Detector:
- Temperature monitoring
- Integrations like mobile app and alerts
- Size and reach
- Built-in siren
- Onboard sensors
- The power source
- Automatic water shut-off feature
These measure the flow of water into your house, directly attached to the water main. During special circumstances, where the monitoring system detects water flow that isn't consistent with every appliance use, it can stop the flow of water automatically. It installs next to your primary water line and doesn't require pipe cutting. It can use ultrasonic technology to identify leaks earlier and prevent severe water damage. A good water flow monitoring system can improve water efficiency and keep costs to a minimum. Most systems provide real-time water data via a computer or smartphone. It can help tremendously with water notifications, benchmarking efforts, and water use for best practices.
7. Check Water Pressure with a Pressure Gauge
A water pressure gauge is a mechanical instrument designed to measure water pressure in a variety of forms and has been around for over a hundred years. Made of up of a dial indicator, a piece of pipe or hose, and a threaded nut to fix to a tap, a pressure gauge is something you'll want to invest in for your home. A water pressure gauge is a wise investment, considering one of the most common issues with plumbing is over-pressured pipes. Water pressure is a measure of a force that pushes water through the water system. Without pressure gauges, fluid power systems are unpredictable. The gauges ensure there are no leaks or pressure changes.
Digital Pressure Gauges Allow Measurement of:
- Pressure
- Torque
- Load
- Force
- Hardness
Absolute pressure is the measure of pressure including ambient air, such as compression ratio calculation. They make gauges measuring higher pressure of steel while they make lower pressure gauges of bronze. Increase in water pressure that is too high can cause pipes and hoses to burst. Buy a water pressure gauge and attach it to the outside of a faucet and it will give you a reading of the pressure. They make typical water systems to withstand 40–70 psi. If your water pressure surpasses 100 psi, install a pressure regulator. Call the plumber if you spot levels under 30 psi or over 80 psi. You can measure static water pressure and identify leaks in plumbing or gardening systems. Having too much water pressure can be hard on lines and fixtures or cause problems with flex lines and hoses. If your pressure is too low, call your water supplier or utility and ask about someone coming out to look at the problem. They can adjust the pressure reducing valve (PRV) and fix the pressure.
8. Buy or Replace a Pressure Release Valve
Also called "water pressure reducing valves," this valve can help with any increase in pressure caused by temperature decrease in freezing pipes and help prevent them from bursting. It can control or limit the pressure in the water system. It brings the pressure down to a safe level before the water reaches any plumbing in the home. A valve costs about $20 and calling in expert help might be around $200. This ensures proper diagnosis and installation. Protected by a water pressure reducing valve, the water system has less stress on inner valves, faucets, and appliances. You can purchase a pressure release valve at a hardware store. After installation, test the water pressure and adjust the regulator. Replace a failing valve immediately. Water heater release valves can drain water to reduce inner tank pressure. If water inside gets too hot or pressure reaches an unsafe level, the water heater triggers to the valve to open. Checking the valve on your water heater can help prevent burst pipes. The valves remove excess pressure by opening up and minimizing pressure.
Valves Can:
- Be composed of metallic like iron or brass
- Range from 10 to 70 or 0 to 50 pounds (ca. 23 kg) per inch
- Withstand temperature up to 300 degrees Fahrenheit (ca. 149 °C).
- Come in various sizes, lengths, and widths to accommodate.
You can reduce or eliminate leaks around your windows and doors by purchasing a tube or a few and doing the job yourself. If you notice a crack, caulk it! Telltale signs of water leakage may be mold spots, bubbled paint, crumbly drywall or plaster, or termite activity. With blowing winds and strong rains, water can easily get into your home. Seepage can damage window frames and the surrounding drywall. Apply caulk to both sides of the window and use weather stripping to seal up spots that won't close tightly. Consider installing storm windows for additional layers of protection. Sealing your windows and doors will prevent water from coming in and increase the electrical efficiency of your home.
10. Monitor Your Water Bill
Check your water bill regularly and get an estimate of the average amount of water used per month. If your usage jumps tremendously from one month to the next, without obvious explanation, you may have a mystery water leak. An unusually high water bill may be due to:
* A leaking toilet
- A dripping faucet
- Filling a swimming pool
- Watering the lawn
- People being home for summer breaks
- Water-cooled AC Units
- Broken pipe or leak or leaking water heater
- Water cycling continuously
- Running water to prevent freezing of pipes
Clean your gutters once every few months to avoid blockage. Standing water can cause damage to your gutters and roof or puddles that could damage your foundation. A clogged gutter can send water down the side of your house. It costs around $50-$250 to clean gutters. In winter, clear out ice dams as soon as they appear.
12. Install Gutter Guards
Install gutter guards, or attachments used to protect the clogging of your gutters so that water can flow away from your home and not pool up around your foundation. Gutters can get clogged easily because of dead leaves, nests, and branches. If gutters are regularly clogging with leaves and debris, then install the guards. They will prevent gutters from clogging up and prevent you from having to clean them constantly. If your gutters are too high, hire a professional to check and clean them.
13. Clean Downspouts and Decline Your Soil
Clean the downspouts so that water can get through. Direct downspouts 5-10 feet (ca. 3 m) away from the house. Slope your yard away from the foundation. Slope keeps water from getting down next to your foundation, and when left unchecked could cause cracks, wall leaning, and create leaks. Water should flow away from your home toward the street, backyard, or back alley.
14. Maintain Trees and Shrubs
Try to minimize landscaping near pipes or remove trees or bushes that have grown too big. Do not let your soil get too dry in drought, as your house can dry and shrink. Run a soaker hose half a foot away from the foundation and 3 inches (ca. 8 cm) beneath the soil to keep it from contracting and expanding. Trees with invasive root systems could grow into your sprinkler system, drainage field, or pipes. Plant trees at least 20 feet (ca. 6 m) away from your home.
15. Decline Your Soil
Move the soil around your house with a shovel and rake to decline it. You want your soil to ramp down away from the foundation wall. Pack the soil so that you encourage water to move along the top instead of soaking into it. Create a downward slope away from your home and this will encourage water to flow away instead of soaking your foundation.
16. Monitor Your Sump Pump
This pump is usually in the basement. It represents your home's last line of defense during raising groundwater or flooding on the inside. When the water rises in this pit, the buoyant float sets off the connected motor, telling it to pump water out of the home. It removes water from where it shouldn't be to a better area.
- Test more often during the thunderstorm season.
- Check at least once a year and several times during heavy storm seasons.
- Make sure you connect the pump to the electrical outlet (GFCI)
- Make sure the pump turns on
- Ensure the circuit breaker is flipped on
- Ensure your pump is upright and not tilted
- Check that the sump pump is pouring water into the sump pit
- Slowly fill the sump pump with water and make sure the water level falls
- Unplug the main pump and test the backup pump
- Testing is free and the pump costs anywhere from $150 to $350. Putting it off could result in your basement flooding.
Repair any obvious dripping pipes. Check for dark spots around pipes and on the ceiling. Repair any cracked caulking. Also inspect the roof for missing, loose, or damaged shingles. Look for moss that can work under shingles and damage from fallen limbs. Check for proper drainage. Insufficient drainage weakens your foundation and can cause cracks, uneven settling, and ways for water to enter your home.
18. Repair Your Chimney!
Inspect and repair your chimney. Loose mortar or cracked bricked may cause issues. Look for signs of leakage around the chimney. Rain can come through uncapped chimneys, especially from the sides. It can cause major water damage in the attic, walls, and floors.
To prevent damage you can:
- Install a chimney cap
- Inspect the metal flashing around the chimney
- Have chimney mortar sealed
- Repair cracks in brick or mortar
Replacing your pipes will ensure that no pinhole leaks damage your home. Exchange copper pipes for corrosion-free ones. Change out corroded or solid copper pipes with the replacing PEX pipes. The copper pipe joints can fail. It can cause corrosion that leads to holes, resulting in silent but steady leaks of water. Drips such as this can lead to damage to ceilings and on the inside of the walls.
20. Install Floor and Drain Pans
Consider implementing floor plans under your appliances. They can help prevent damage from small or subtle undetected leaks in your home. You may need to install a drain or create a sloped surface to help water move to the right area to drain.
Preventative Measures to Reduce the Risk of Water Damage
So no matter what the cause of water damage, you can follow all these suggestions to help reduce the risk of bursting pipes, water damage, and flooding in your home. Taking preventative measures can help you avoid or lessen the chances of this destructive damage from happening, which will not only make you happy but your homeowner's insurance company as well!
Fire Damage
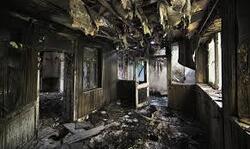
According to the National Fire Protection Association (NFPA), fire departments respond to over 350,000 home structure fires a year nationwide, causing almost $7 billion in direct damage. Far more tragic than property destruction, is the more than 2,500 civilian fire deaths and 12,300 civilian fire injuries annually.
Learn About Fires
A small house fire can be just as costly as a large one, not from the fire but the smoke. Smoke gets every where and removing the smell could mean demoing the house down to the studs. Along with the fire you will have water damage from the fire department putting the fire out. In most cases it takes a while to even begin the clean up and restoration process because of insurance and fire investigation. So along with fire smoke and water damage your most likely going to have mold growth and damage as well. Read more to find out more about fire and how to prevent them from happening.
A working smoke alarm significantly increases your chances of surviving a deadly home fire.
If you are insured, contact your insurance company for detailed instructions on protecting your property, conducting inventory and contacting fire damage restoration companies.
Create and Practice a Fire Escape Plan
Remember that every second counts in the event of a fire. Escape plans help you get out of your home quickly. Practice your home fire escape plan twice each year. Some tips to consider when preparing this plan include:
Learn About Fires
A small house fire can be just as costly as a large one, not from the fire but the smoke. Smoke gets every where and removing the smell could mean demoing the house down to the studs. Along with the fire you will have water damage from the fire department putting the fire out. In most cases it takes a while to even begin the clean up and restoration process because of insurance and fire investigation. So along with fire smoke and water damage your most likely going to have mold growth and damage as well. Read more to find out more about fire and how to prevent them from happening.
- Fire is FAST! In less than 30 seconds a small flame can turn into a major fire. It only takes minutes for thick black smoke to fill a house or for it to be engulfed in flames.
- Fire is HOT! Heat is more threatening than flames. Room temperatures in a fire can be 100 degrees at floor level and rise to 600 degrees at eye level. Inhaling this super-hot air will scorch your lungs and melt clothes to your skin.
- Fire is DARK! Fire starts bright, but quickly produces black smoke and complete darkness.
- Fire is DEADLY! Smoke and toxic gases kill more people than flames do. Fire produces poisonous gases that make you disoriented and drowsy.
A working smoke alarm significantly increases your chances of surviving a deadly home fire.
- Replace batteries twice a year, unless you are using 10-year lithium batteries.
- Install smoke alarms on every level of your home, including the basement.
- Replace the entire smoke alarm unit every 10 years or according to manufacturer’s instructions.
- Never disable a smoke alarm while cooking – it can be a deadly mistake.
- Audible alarms are available for visually impaired people and smoke alarms with a vibrating pad or flashing light are available for the hearing impaired.
If you are insured, contact your insurance company for detailed instructions on protecting your property, conducting inventory and contacting fire damage restoration companies.
Create and Practice a Fire Escape Plan
Remember that every second counts in the event of a fire. Escape plans help you get out of your home quickly. Practice your home fire escape plan twice each year. Some tips to consider when preparing this plan include:
- Find two ways to get out of each room in the event the primary way is blocked by fire or smoke.
- Make sure that windows are not stuck, screens can be taken out quickly and that security bars can be properly opened.
- Practice feeling your way out of the house in the dark or with your eyes closed.
- Teach children not to hide from firefighters.
- If you use a walker or wheelchair, check all exits to be sure you can get through the doorways.
- Make digital copies of valuable documents and records like birth certificates.
- Sleep with your bedroom door closed.
- Keep a fire extinguisher in your kitchen. Contact your local fire department for assistance on proper use and maintenance.
- Consider installing an automatic fire sprinkler system in your residence. Prevent Home Fires Home fires can be preventable. The following are simple steps that each of us can take to prevent a tragedy.
Cooking - Stay in the kitchen when you are frying, grilling or broiling food. Turn off the stove if you leave the kitchen for even a short period of time.
- Wear short, close-fitting or tightly rolled sleeves when cooking.
- Position barbecue grills at least 10 feet away from siding and deck railings, and out from under eaves and overhanging branches.
- Keep a fire extinguisher available. Electrical and Appliance Safety
- Frayed wires can cause fires. Replace all worn, old or damaged appliance cords immediately and do not run cords under rugs or furniture.
- If an appliance has a three-prong plug, use it only in a three-slot outlet. Never force it to fit into a two-slot outlet or extension cord.
- Immediately shut off, then professionally replace, light switches that are hot to the touch and lights that flicker. Keeping Children Safe
- Take the mystery out of fire play by teaching children that fire is a tool, not a toy. Fireplaces and Woodstoves
- Inspect and clean woodstove pipes and chimneys annually and check monthly for damage or obstructions.
- Use a fireplace screen heavy enough to stop rolling logs and big enough to cover the entire opening of the fireplace to catch flying sparks.
- Make sure the fire is completely out before leaving the house or going to bed. Portable Space Heaters
- Keep combustible objects at least three feet away from portable heating devices.
- Only buy heaters evaluated by a nationally recognized laboratory, such as Underwriters Laboratories (UL).
- Check to make sure the portable heater has a thermostat control mechanism and will switch off automatically if the heater falls over.
- Only use crystal clear K-1 kerosene in kerosene heaters. Never overfill it. Use the heater in a well-ventilated room away from curtains and other flammable items. More Fire Prevention Tips
- Never use a stove range or oven to heat your home.
- Keep combustible and flammable liquids away from heat sources.
- Portable generators should NEVER be used indoors and should only be refueled outdoors and in well ventilated areas.
- Store matches and lighters out of children's reach and sight, preferably in a locked cabinet.
- Never leave children unattended near operating stoves or burning candles, even for a short time.